
More Chinese New Year cookies!!! Beehive cookies, honeycomb cookies, kuih loyang, kuih rose or we call it "kueh lobang" (in Hokkien) even, seeing these cookies makes the perfect indication that that the big festive season is just around the corner. My maternal grandma loved this, mom and all her sisters loves this and I loooove this. Sounds like something to do with the XX chromosomes eh? lol. Mom is not one that particularly likes baking. She easily gets impatient when it comes to baking. These beehive cookies are probably the only type of cookies that I have seen her making in our kitchen, apart from a couple of other cakes all of which are specialties of hers. So some years when mom's into the cookie-making mood, we'll be having this readily in the kitchen. Other years, we would just buy them!
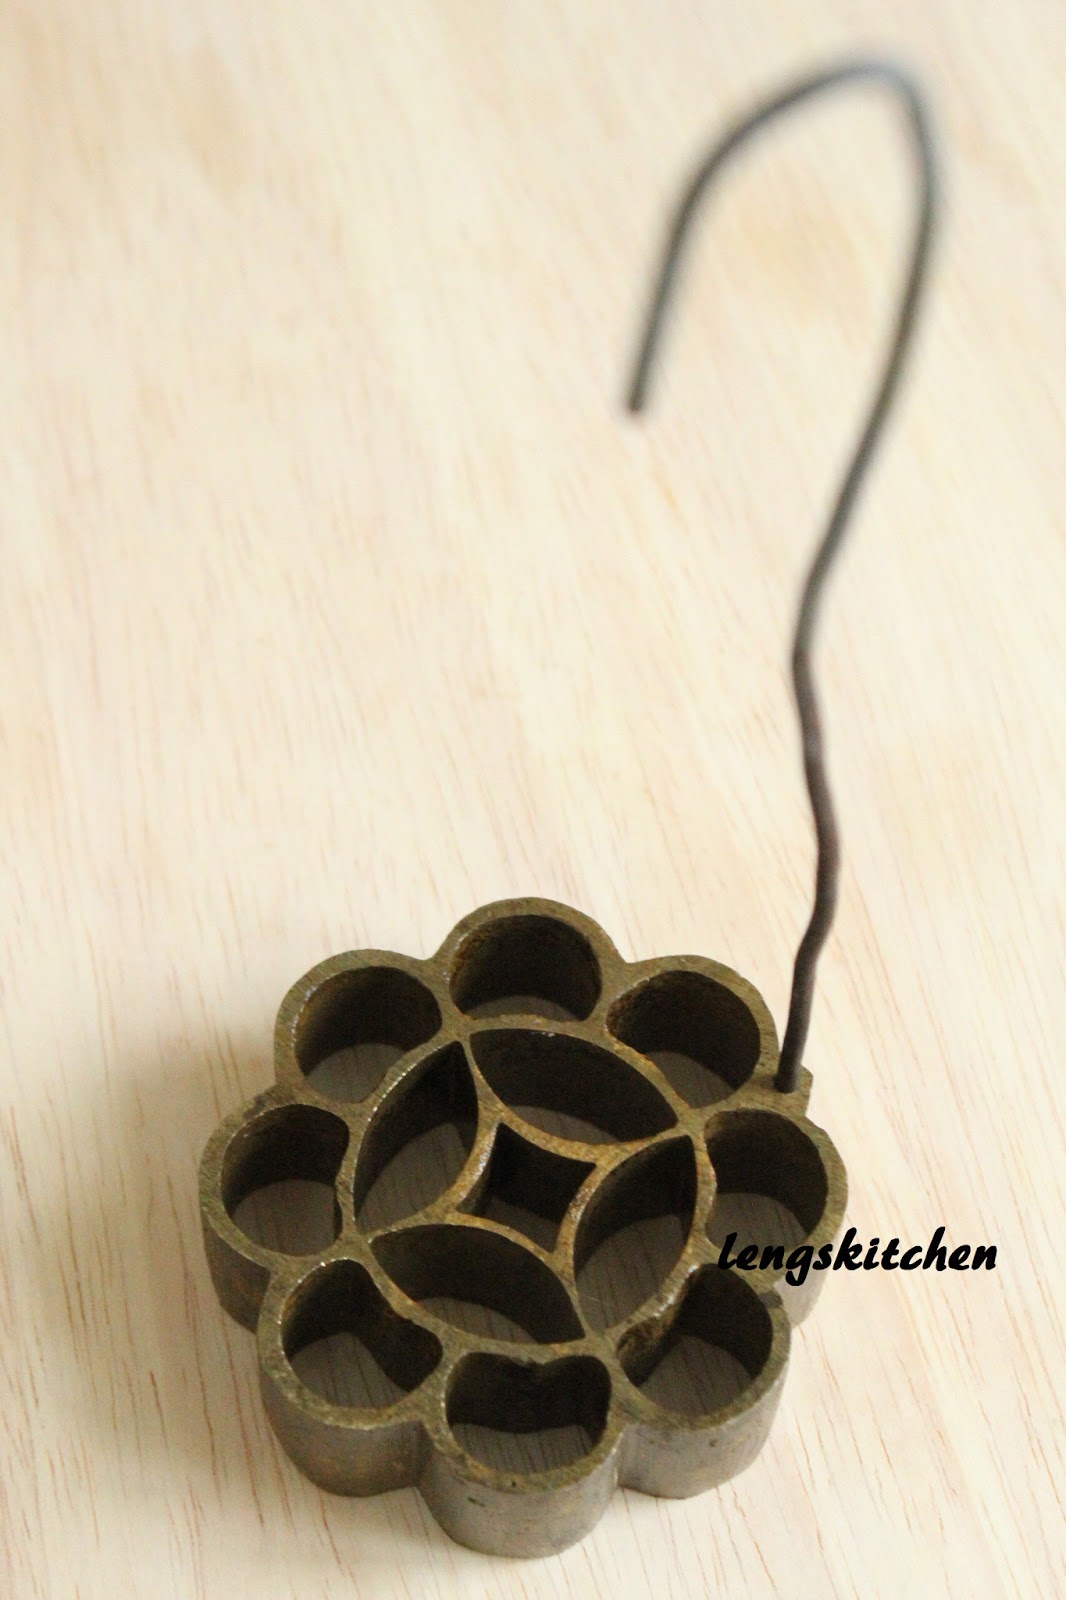
This brass mould was a real treasure of my maternal grandma. It was passed down to mom for a good decade or two and when I moved here, mom made sure I brought it along with me. So old it sure is. But with it you can see how sturdy, strongly built, precious and especially meaningful it is to me. And of utmost importance, it never disappoints! So good I have never really considered looking for a brand new, shiny, perfectly polished moulds in the market even if that means that I can expect to spend a lot of time working with just one mould in hand.

As much as we both love this, we couldn't help rambling and grumbling each time we had to buy these cookies. Well yet we did it time after time, again and again lol. For some really basic and simple ingredients used in its making, the hefty price printed on the price tags do make it a little hard a fact to accept. But then again I have to agree; they do have good reasons to be so well priced after all.
Making this is like a battle against the heat. Physically you will have to endure the heat as you stand in front of the wok patiently frying them away - another reason it always drives mom away from the idea of making this back at home. I was spared the agony here; the freezing cold weather outside made it all so nice for me to be working with some heat indoor. And then comes the battle of heat between the batter and the oil. You will have to spend a moment experimenting in the beginning and adjusting thereon. I made 44 pieces in total in this batch; 3 got beyond recognition (way too browned - the hot oil won hands down intimidating the batter lol); another 2 was kind of lacking in presentation and appearance (the batter and oil started getting used to one another nevertheless lol). But once you have managed to reach that equilibrium between them, the rest of the story is about maintaining the flow and keep the connection steady in between the two.

This is my fourth time making these beehive cookies and it comes with plenty of trials and errors going on still. Using a recipe I adapted from My Kitchen Snippets on her post on Kueh Rose/Kueh Goyang this time around with just some minor adjustments, this recipe is by far the best recipe that has given me a batch of beehive cookies that really look like what their name suggests lol, not forgetting the promised crunch and mouthfeel that come in a package. Look out for the few extra notes that I penned down alongside the methods as they get laid out. Some simple points, but they are exactly the little details I will usually pay attention to for a batch of nicely shaped beehive cookies (although I do tend to forget them myself and thus a need for some self-reminder here).

Beehive Cookies 蜂窝饼
Adapted from My Kitchen Snippets
Makes 44 cookies
250g rice flour
4 tbsps all-purpose flour
3 eggs
200g granulated sugar
400ml thick coconut milk
1/4 tsp salt
enough cooking oil for deep frying
1. Break the eggs into a mixing bowl. Add in sugar followed by the coconut milk and whisk until the sugar gets dissolved.
2. Sift together the rice flour, the all-purpose flour and the salt. Add this flour mixture to the mixing bowl in (1). Whisk until they combine really well.
3. Heat up enough cooking oil in a wok on high heat. Make sure that the oil is well heated before you begin. I have it tested with a wooden chopstick. A stream of tiny bubbles seen as the end of the chopstick is dipped into the oil indicates that the oil is ready. Turn the heat down to medium. Place the brass mould into wok and let sit and preheat for about a minute.
- Working with just one single mould throughout the whole frying process, I could only deal with two cookies comfortably at any point. So I needed cooking oil just enough for two cookies to swim around spaciously. The oil must be hot enough to begin with so that the cookies won't get all so greasy in the end.
4. Transfer the mould into the batter and dip just deep enough to cover the sides neatly, leaving the top surface batter-free. Keep still for about 5 seconds.
5. Transfer the mould into the hot oil, keeping it immersed for about 15 seconds. Lightly shake to free the cookie and leave the mould in the hot oil.
- As you remove the brass mould from the oil, lightly shake off any excess oil. If these extra oil drippings ended up in the batter, they may change the batter consistency and its clinging ability. As the mould gets dipped into the batter, you will hear some faint sizzling sounds as the batter starts adhering to the mould. Leave undisturbed for about 5 seconds to secure the adhesion before lifting the mould up and away.
6. Let the first cookie fry while you bring in the second cookie repeating steps (4) - (5)
- As you plunge the mould with the batter back into the hot oil, make sure that the mould does not come into contact with the bottom of the wok. Leave it fully immersed in mid-oil while you make the 15-second countdown. That 15 seconds let the batter cook and take shape lightly. Shaking the batter off too soon and too hard will make the outermost layer "open up".
- There is a chance that the cooking oil is still a tad too hot and the first few cookies will get burnt. But as the frying goes, the batter will tame the heat down gradually. Mine only got right as I went into my 5th cookie. And as I entered my 10th, I had to turn the heat up to medium-high. So check the heat about every 5 cookies and adjust it accordingly in between medium and medium-high.
7. When the first cookie has turned golden brown, remove the cookie and drain on a sieve.
- With the second cookie in the wok, I likewise let it cook on the mould for about 15 seconds before shaking it free. By now the first cookie would have just picked up a tinge of browning. You will notice how the browning is usually concentrated on the bottom half while the floating top will appear paler in color.
- Using the mould, I would lightly place it on top of the first cookie so that the whole cookie gets immersed in the hot oil (again make sure the cookie doesn't touch the wok). Hold it there for another 10 to 15 seconds. The wave action from the heat beneath the wok will continue shaping the cookie. And at the end of it you'll notice a nice and even change of color on the cookie. Now you can let it float and brown a little more on its own. Yup, no flipping required. It won't take much longer from there. Leave the mould in the hot oil meanwhile getting it ready for the next cookie.
- The cookie takes its final shape the moment it gets removed from the oil and exposed to the cool air, hardening them. When you remove the cookie from the oil, be sure to use either a flat spatula/sieve or the cookie will take whatever shape you let it rest on. Turn the cookie over as it rests on the spatula/sieve. The gravity will keep the cookie structure intact and neat (especially the outer layer). Let it cool down lightly before transferring it to a plate lined with a paper towel, face down.
8. Repeat steps (4) - (7) until all the batter has been used up.
9. Let cool completely and store in air-tight containers.
- When the batter level gets too low for the mould to be fully dipped into, pour the batter into a smaller bowl before you continue.


Yummmmmmmmm... lol

Oh my.. they look perfect!
ReplyDeleteThank you, Wendy! :)
DeleteJust used this recipe for the batches we did last night and it turned out perfectly. (well the taste, the shapes are not as perfect as yours because we were too impatient and shook them loose quicker, we have 4 batches to do!). I will be coming back to this year after year and starting a tradition with the family of making these :) Thanks so much!!!!
ReplyDeleteHi Jacquie! You totally made my day! I know how impatient we can get especially when all we want is to just get this done and over with, sit down and start snacking away hahhaha. Well I am glad you liked it! Thank you very much for your feedback! :)
DeleteWhat the shape you get...?
DeleteHi Jacquie, I think You need need bit more rice flour to make ticker (optional)...n you need well heat the mould deep into oil cantact bottom of pot or wok....use 2-3 mould in 1 time to save for waiting
Deleteuse 2-3 mould in 1 time to save for waiting reheat the mould... control the heat well you can finish fast...ask someone help flip it after you dip n put in into wok... wok is the best to this... happy day
DeleteIs it ok to use only flour instead of rice flour & all purpose flour ??
DeleteHi where to buy the pattern any idea thank you
DeleteIt looked absolutely perfect! I'm soooooo gonna try this. Thanks for the detailed explanation!
ReplyDeleteThanks for the recipe. Been using this since last year. Still go a bit if working on getting it cooked evenly and maintaining the shape.
ReplyDeleteWhats wrong...
DeleteWow I want to try this.how many cup?
ReplyDeleteFor coconut thick milk, did u add water from 250ml of coconut milk to make up to 400ml?
ReplyDeleteHi Qamarul, no, I did not add any water to the coconut milk. The coconut milk here comes in cans and each can is 400mL. I used one whole can (400mL) for this recipe.
DeleteSorry... You can use fresh coconut milk... add water depend on the thickness of the coconut milk... happy cooking thanks
DeleteHi, your Kuih Rose is so pretty. Can I know what brand of coconut milk you are using? Thanks
ReplyDeleteThanks, Eric! "Chaokoh" brand is my favorite so far :)
DeleteFresh coconut molk can...? Thanks!!
DeleteI did this last year and have had good reviews from friends and family. I added sesame seed b4 frying to half the batch. I will make this again this year! Thanks
ReplyDeleteSesame... yummy
DeleteI did this last year and have had good reviews from friends and family. I added sesame seed b4 frying to half the batch. I will make this again this year! Thanks
ReplyDeleteI tried your technique in frying the honeycomb, it turn out so beautiful with the shape like they were likely to be sold outside!!
ReplyDeleteWell done...
DeleteWell done...
DeleteThank u for this recipe kitchenchaos.4 times I make this recipe my husband n kids very like.
DeleteSo yummy
Thank u for this recipe kitchenchaos.4 times I make this recipe my husband n kids very like.
DeleteSo yummy
Well done...
ReplyDeleteWhere could I purchase the mould?
ReplyDeleteWhere could I purchase the mould?
ReplyDeleteHow do I remove excess oil? Its still oily after 1 day
ReplyDeleteWhere can I purchase the mould?
ReplyDeleteMade this yesterday and it turned out so good. Thank you so much for your recipe and detailed instructions, it helped a lot! Now I'm on the hunt for a prettier and detailed mould like yours ;)
ReplyDeleteWhere is the iron sold? I have scandinavian ones, but I would like to buy this one since I entertain for the Chinese New Year/
ReplyDeleteWhere can I buy this brass mould. Please advise
ReplyDeleteMade beehive cookies on the weekend using your recipe. It was a big hit. Cookies not as prefect as yours, I think I just need a little bit more practice. Thank you so much!!
ReplyDeleteThere has been a couple of questions as to where we can purchase the mould...(is this the correct spelling?)have not seen any response.
ReplyDeleteI, too, am interested in the mould. I am from Hawaii and left the islands just after high school, many moons ago...
I brought with me a mould and with the many moves, for the life of me, don't know where it is!!! I think of it often and really miss it. I stumbled across your blog and now really on a mission to get another mould. PLEASE, where can I get one?
Hi, I'm not sure if you can find one here in the States. I brought mine from Malaysia, it was passed down from my grandma. Maybe try ebay? Look for "chinese beehive cookie mold".
DeleteLook/Google Rosette Iron and you will find a lot on line.
DeleteDone 2 batches beehive cookies today for 2023 Chinese New Year using your recipe. Huge Success! Thank you so much!!
ReplyDeleteDemasiado preciosas pará comerse, ¡felicidades! Extraordinarias. Gracias por compartir🤤😋🙏
ReplyDelete